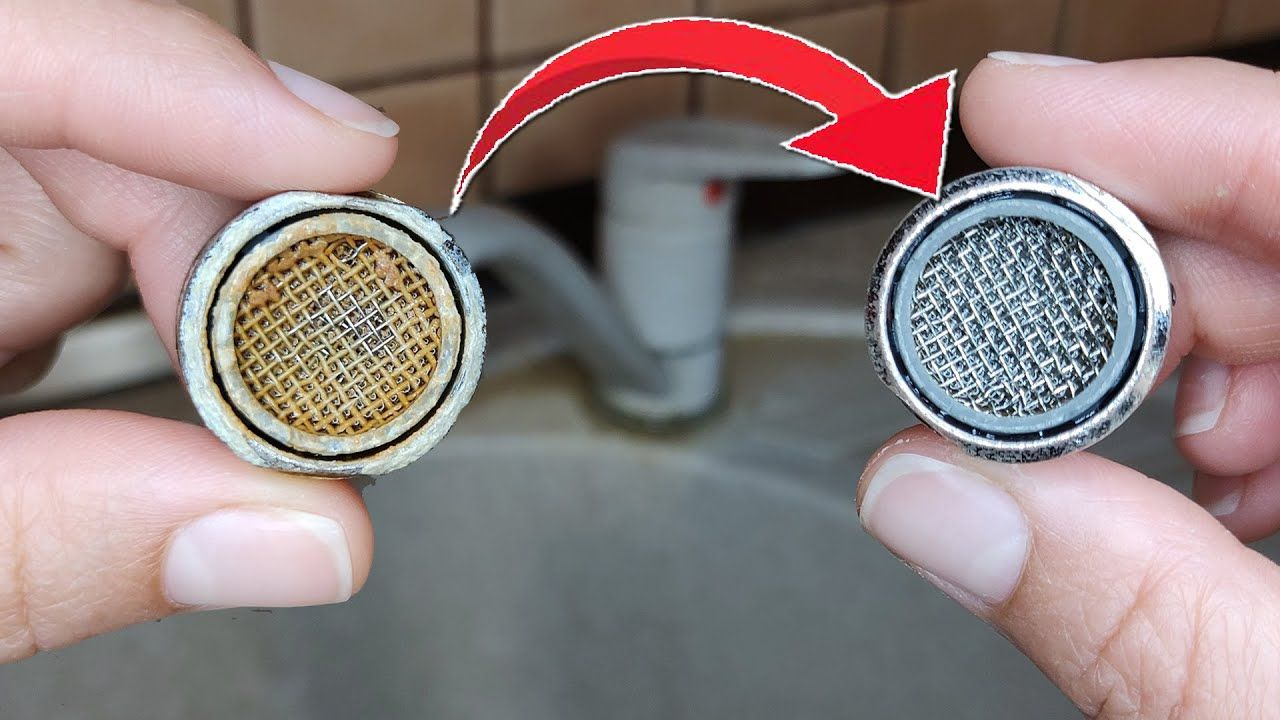
How to Clean a Faucet Aerator
Reading time: 5 minutes
Skill level: Beginner
Cost: $0 to a few dollars
A faucet that suddenly has weak, uneven, or sputtering water flow may have a clogged aerator.
The aerator is the small screen or insert at the end of many faucets. It helps shape the water stream and, depending on the design, can mix air into the water or regulate its flow. Over time, mineral deposits and debris can collect in the aerator and restrict the flow.
Cleaning it is usually a simple job. The important part is making sure the aerator is actually the cause before taking it apart.
Quick answer
To clean a faucet aerator:
- Check whether the low flow affects only one faucet.
- Identify whether the aerator is removable.
- Remove it by hand or with the appropriate tool if the faucet manufacturer allows removal.
- Rinse away loose debris.
- Soak the removable parts in a 50/50 mixture of white vinegar and water if the manufacturer permits it.
- Gently scrub away remaining deposits with a soft brush.
- Rinse the parts thoroughly and reinstall them.
- Test the faucet.
If the faucet still has weak flow after cleaning, the problem may be the shutoff valve, supply line, cartridge, flow restrictor, or the home’s water pressure rather than the aerator.
Project summary
| Item | Details |
|---|---|
| Time required | About 10 to 30 minutes, depending on buildup |
| Skill level | Beginner |
| Estimated cost | Usually $0 if you clean the existing aerator |
| Tools needed | Cloth, bowl, soft toothbrush, pliers or aerator key if required |
| Supplies | White vinegar and water |
| Main risk | Damaging the finish, threads, or a concealed aerator by forcing it |
Is the aerator definitely the problem?
Before removing anything, determine whether the weak flow affects one faucet or several fixtures.
| Symptom | More likely causes |
|---|---|
| One faucet has low flow | Clogged aerator or another faucet-specific restriction |
| Both hot and cold water are weak at one faucet | Aerator, cartridge, supply line, or another faucet restriction |
| Only hot or cold water is weak | Supply valve, supply line, or faucet cartridge |
| Several fixtures have low flow | House-wide water-pressure or plumbing problem |
If every faucet and shower in the home has weak flow, cleaning one aerator is unlikely to solve the underlying problem.
If the problem started suddenly after plumbing work or installing a new faucet, debris in the plumbing can also be worth investigating. Manufacturers recommend cleaning aerators when debris or mineral deposits affect their performance.
For broader problems affecting water pressure throughout the house, see our guide: Why Is My Water Pressure Low?
What Does a Faucet Aerator Do?
A faucet aerator is located at or near the end of the faucet spout. Depending on the faucet, it may contain screens, a flow-regulating component, or other parts that shape the water as it leaves the faucet.
Aerators can:
- Create a more controlled, even stream
- Reduce splashing
- Mix air into the water on some designs
- Help control the faucet’s flow rate
- Catch some debris before it comes out of the faucet
Not every faucet uses the same type of aerator. Some are externally threaded, some are internally threaded, and some are concealed inside the end of the spout. Manufacturers also make aerators with different flow rates and attachment methods.
That is why you should identify the aerator before trying to remove it.
Signs Your Faucet Aerator Needs Cleaning
A dirty or clogged aerator may cause:
- Weaker water flow from one faucet
- Water that sprays in different directions
- A sputtering or uneven stream
- Gradually decreasing flow
- Visible white or chalky deposits around the faucet tip
- Debris coming from the faucet
- Reduced flow after plumbing work
Mineral deposits are more likely to become a problem where the household has hard water. USGS notes that hard water can cause mineral buildup in plumbing and fixtures and can contribute to clogged pipes and reduced performance.
What you Need
You usually do not need many tools.
- Soft cloth
- Small bowl or container
- Soft toothbrush
- White vinegar
- Water
- Pliers, if needed
- Aerator removal key, if your faucet requires one
If you need pliers, wrap the faucet or aerator with a cloth first to help protect the finish.
Do not grab a decorative faucet finish directly with bare pliers.
Step 1: Identify the Aerator
Look at the end of the faucet spout.
Some aerators are visible and can be unscrewed. Others are recessed into the spout and require a small removal key. Some faucets use an aerator or flow-control component that is not designed to be removed by the homeowner.
Do not assume that every faucet aerator comes out by turning it with your fingers.
Check the faucet manufacturer’s instructions if you are unsure. This is particularly important with concealed aerators and faucets with proprietary parts.
Step 2: Remove the Aerator if It Is Designed to Be Removed
Place a cloth over the aerator before using pliers or another tool.
If the aerator has external threads and is designed to be removed, loosen it carefully.
If it does not move with reasonable force, stop.
Forcing a stuck or concealed aerator can damage the threads, finish, or faucet itself. Some manufacturers specifically state that certain aerators are not intended to be removed and instead provide instructions for cleaning them in place.
If your faucet has a concealed aerator, use the manufacturer’s recommended removal key rather than trying to pry it out.
Step 3: Rinse Away Loose Debris
Once the removable aerator is out, rinse it under running water.
Turn it over and rinse both sides.
Loose sediment may come out immediately. You may also see white or chalky deposits caused by mineral buildup.
Do not use a sharp object to aggressively scrape the screen. You can damage the small openings and change the way the aerator works.
Step 4: Soak the Aerator
If the faucet manufacturer permits vinegar cleaning, place the removable aerator parts in a mixture of equal parts white vinegar and water.
Allow the parts to soak long enough to loosen the mineral deposits. The required time depends on how much buildup is present and the manufacturer’s instructions.
For some faucet models, manufacturers specifically recommend a 50/50 mixture of white vinegar and water for cleaning an aerator.
Do not assume that every faucet finish or every aerator can be treated the same way. If the aerator cannot be removed, follow the manufacturer’s instructions for cleaning it in place.
What About Using Vinegar Directly on the Faucet?
Be careful here.
A vinegar solution may be suitable for cleaning some faucet components, but faucet finishes vary. Do not soak or leave vinegar on the faucet’s exterior unless the manufacturer says it is safe for that finish.
If you use a vinegar solution around the faucet, rinse the area and dry it afterward.
Step 5: Gently Scrub the Deposits
After soaking, use a soft toothbrush to remove loosened mineral deposits and debris.
Pay attention to the screens and small openings, but do not scrub aggressively.
If deposits remain, another short soak may be better than trying to force them out with a sharp tool.
Rinse everything thoroughly when finished.
Step 6: Check the Washer and Other Parts
If your aerator has a small rubber washer or other removable components, check them before reassembly.
A damaged, flattened, cracked, or missing washer can cause leaking around the aerator.
Keep track of the order of the parts as you remove them. Some aerators contain several small components, and reinstalling them incorrectly can affect the water flow.
Step 7: Reinstall the Aerator
Reinstall the cleaned aerator according to the faucet manufacturer’s instructions.
If it is designed to screw into place, start the threads carefully by hand.
Do not cross-thread it.
Tighten it securely, but do not overtighten it. Excessive force can damage the threads or make the aerator difficult to remove later.
Turn the water on slowly and check for leaks.
What If the Aerator Is Stuck?
Do not immediately reach for a large pair of pliers.
First determine what type of aerator you have.
A concealed aerator may require a special key. Some models are designed to remain in the faucet and can only be cleaned from the outside. Other models can be removed with needle-nose pliers or a manufacturer’s tool.
For example, Delta’s instructions vary between faucet models. Some aerators can be removed and cleaned, while other models are specifically not designed to be removed.
If you cannot identify the aerator, look up the faucet’s model number and manufacturer’s cleaning instructions before forcing it.
Common Mistakes to Avoid
1. Using too much force
A stuck aerator is not necessarily one that needs more force. You may be dealing with a concealed or non-removable design.
2. Using a sharp object to clean the screen
A knife, pin, or other sharp object can damage the screen or enlarge the openings.
Use a soft brush instead.
3. Using harsh cleaners
Do not assume that stronger chemicals will clean the aerator better.
Start with water and a manufacturer-approved cleaning method. White vinegar diluted with water is commonly recommended for mineral deposits on certain faucet components, but the manufacturer’s instructions should take priority.
4. Forgetting the washer
A missing or damaged washer can cause a leak when the aerator is reinstalled.
5. Overtightening the aerator
The aerator needs to seal properly, but excessive force can damage the threads.
What If the Faucet Is Still Weak After Cleaning?
If cleaning the aerator does not restore the flow, do not keep cleaning the same part.
Check the following:
Check the shutoff valves
Make sure the hot and cold-water supply valves underneath the sink are fully open.
Compare hot and cold flow
If only hot or only cold water is weak, the problem may be on that side of the faucet’s supply or inside the faucet.
Check another faucet
If other fixtures have normal flow, the problem is probably local to the affected faucet.
If several fixtures have weak flow, investigate the home’s water pressure or plumbing instead.
Consider the faucet cartridge
A cartridge can restrict water flow when it becomes blocked or damaged.
If cleaning the aerator does not solve a one-faucet problem, the cartridge or another internal faucet component may need attention.
See How to Replace a Faucet Cartridge if your faucet uses a replaceable cartridge.
Consider debris elsewhere in the faucet
After plumbing work, installation, or repairs, debris can sometimes affect components farther inside the faucet.
The exact troubleshooting procedure depends on the faucet design, so check the manufacturer’s instructions before removing internal parts.
When Should You Replace the Aerator?
Cleaning is usually worth trying first, but replacement makes more sense when:
- The screen is damaged
- The housing is badly corroded
- The threads are damaged
- The aerator leaks after proper installation
- The internal components are damaged
- Cleaning does not restore normal flow
- You want a different flow rate
When buying a replacement, match the faucet model or the existing aerator as closely as possible.
Do not rely only on whether the aerator looks similar. Thread size, design, flow rate, and the way the part attaches to the faucet can vary.
For a faucet with a proprietary aerator, the manufacturer’s replacement part is usually the safest choice.
What Flow Rate Should a Replacement Aerator Have?
There is no single flow rate that is correct for every faucet.
EPA WaterSense-labeled bathroom sink faucets and faucet accessories are certified for a maximum flow rate of 1.5 gallons per minute at 60 psi. That applies to WaterSense-labeled products, not every faucet or aerator on the market.
If replacing an aerator, use the flow rate recommended for your faucet and the type of use.
How Much Does it Cost to Clean or Replace a Faucet Aerator
Cleaning an existing aerator usually costs very little if you already have white vinegar and a toothbrush.
| Job | Typical cost |
|---|---|
| Clean existing aerator | $0 |
| Basic replacement aerator | A few dollars |
| Specialty or proprietary aerator | More, depending on the model |
| Plumber | Varies by location and the actual problem |
The cost of professional repair depends on whether the problem is the aerator, cartridge, shutoff valve, supply line, or another plumbing component.
When to Call a Plumber
Cleaning the aerator is a reasonable DIY job when the problem is limited to one faucet and the aerator is accessible.
Consider professional help if:
- Several fixtures have suddenly lost water pressure
- You suspect a leak
- The faucet or supply connection is damaged
- A shutoff valve will not operate
- You cannot safely remove a faucet component
- Water is leaking inside the cabinet or wall
- Cleaning the aerator does not solve the problem, and you cannot identify the cause
If the entire house has low water pressure, the problem is probably not one faucet aerator.
Frequently asked questions
1. Can I clean a faucet aerator with vinegar?
Often, yes, if the faucet manufacturer permits it. A 50/50 mixture of white vinegar and water is recommended for cleaning some faucet aerators and components.
Do not assume the same method is safe for every faucet finish or aerator design.
2. How long should I soak a faucet aerator in vinegar?
There is no universal soaking time for every aerator. Follow the manufacturer’s instructions. For heavy mineral buildup, a longer soak may be appropriate for models that permit soaking.
Do not leave the entire faucet sitting in vinegar.
3. What if my faucet does not have a removable aerator?
Some faucets have concealed or non-removable aerators.
Check the manufacturer’s instructions for the faucet model. Some are cleaned from the outside, while concealed designs may require a special tool.
4. Why is my faucet still weak after cleaning the aerator?
The restriction may be somewhere else.
Check the shutoff valves, compare hot and cold flow, and see whether other fixtures have the same problem. A cartridge, supply line, flow restrictor, or house-wide pressure problem may be responsible.
5. Can hard water clog a faucet aerator?
Yes. Hard water can leave mineral deposits on plumbing fixtures, and those deposits can contribute to restrictions in small openings such as aerator screens.
6. Should I clean or replace my faucet aerator?
Clean it first if the aerator is in good condition and the manufacturer provides a cleaning procedure.
Replace it if the screen or housing is damaged, the threads are damaged, or cleaning does not restore proper flow.
7. Can I use CLR to clean a faucet aerator?
A manufacturer’s instructions should take priority over a general cleaner recommendation.
Because faucet finishes and aerator materials vary, do not assume a commercial descaler is safe for every model. If you are considering a stronger cleaner, check the faucet manufacturer’s care instructions first.
Related articles
Sources
- Moen: Faucet Aerator Cleaning. Covers aerator designs, debris and mineral buildup, and how buildup can restrict flow or affect the spray pattern.
- U.S. Geological Survey: Hardness of Water. Explains mineral buildup associated with hard water and its effects on plumbing and fixtures.
- EPA WaterSense: Bathroom Faucets. Provides current WaterSense flow-rate information for bathroom sink faucets and accessories.
- Delta Faucet: Aerator RP90059. Illustrates why aerator removal and cleaning procedures need to be model-specific.