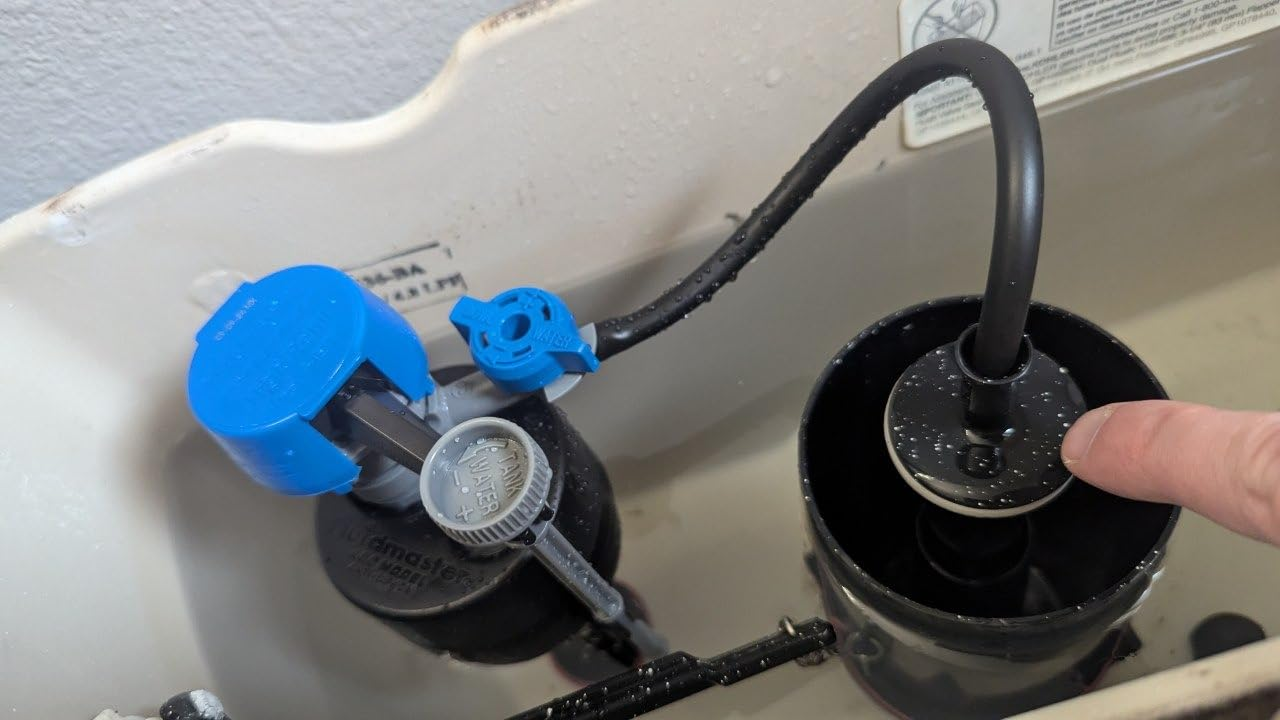
How to Replace the Fill Valve
Reading time: 6 minutes
Skill level: Beginner
Cost: $10 to $20 in parts
Quick answer
A toilet fill valve is the tall plastic assembly inside the tank that refills it after every flush. When it starts to fail, the toilet may run continuously, refill very slowly, or make a constant hissing sound.
If your toilet keeps running after you flush, the fill valve may be the problem. Replacing it is a straightforward DIY repair that usually takes about 30 minutes and costs $10 to $25 in parts.
Replacing a fill valve usually takes about 30 minutes and costs $10 to $20 in parts. The Fluidmaster 400A is a popular universal replacement for many standard toilets, while the Fluidmaster 400H Performax is an option if you want quieter operation and more control over the refill settings.
Project summary
| Item | Details |
|---|---|
| Time required | 30 minutes |
| Skill level | Beginner |
| Estimated cost | $10 to $25 |
| Tools needed | Adjustable wrench, towel, sponge |
| Parts needed | Replacement fill valve |
Why toilet fill valves fail
Most fill valves last between 7 and 15 years. Over time, internal seals wear out, and mineral deposits build up inside the valve body. Hard water can shorten the valve’s lifespan by increasing mineral buildup.
Common signs of a failing fill valve include:
- Continuous running after flushing
- Loud hissing sounds
- Slow tank refill
- Water level rising too high
- Intermittent phantom flushing
But before replacing the valve, make sure the flapper is not the real problem.
How to know if the fill valve is the problem
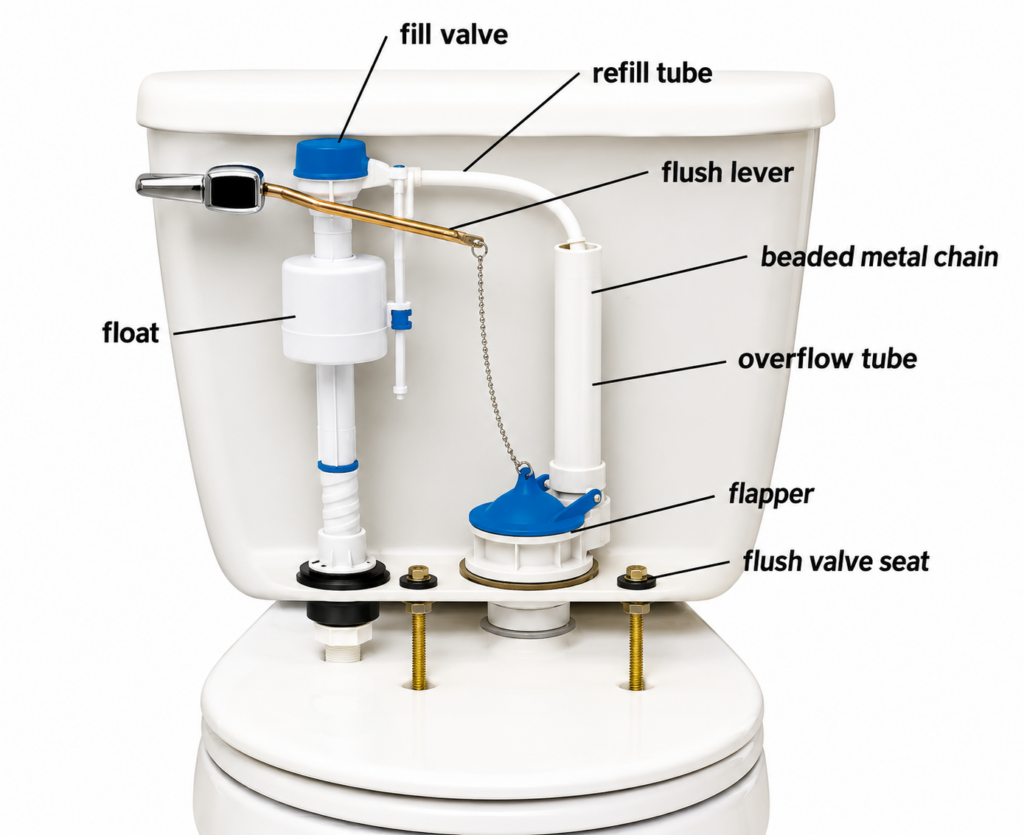
A worn flapper causes many running toilets, so it’s worth checking it before buying a replacement valve.
Before buying a fill valve, do the food-colouring test:
Add a few drops of food colouring to the tank and wait 10 minutes without flushing. If coloured water appears in the bowl, the flapper is leaking
- If colour reaches the bowl, replace the flapper first.
- If no colour reaches the bowl but the toilet continues running, check the water level and listen for hissing. A fill valve may be the problem if the water level is too high, the valve continues running after the tank fills, or the valve makes a persistent hissing or vibrating sound.
| Symptom | Likely cause | Fix |
|---|---|---|
| Toilet runs and coloured water reaches bowl | Worn flapper | Replace flapper |
| Toilet runs, no colour in bowl, water level high | Fill valve or float issue | Inspect fill valve |
| Constant hissing with low or unstable tank water level | Fill valve issue | Inspect or replace fill valve |
| Tank takes more than 3 minutes to refill | Mineral buildup or failing valve | Inspect or replace fill valve |
Recommended replacement valves
Once you’ve confirmed that the fill valve is the problem, you have several replacement options. Check your toilet’s model and the manufacturer’s compatibility information before buying.
| Product | Best for | Typical price |
|---|---|---|
| Fluidmaster 400A | Straightforward, affordable replacement | $10 to $15 |
| Fluidmaster 400H-002 Performax | Quieter operation and adjustable refill settings | $12 to $18 |
| Fluidmaster 400H-5003 Performax 2-Pack | Replacing valves in multiple bathrooms | $20 to $30 |
| Korky 528MP | Some Toto toilets | $12 to $18 |
The Fluidmaster 400A is a popular universal option for many standard toilets and is relatively straightforward for a beginner to install.
If you’re replacing fill valves in multiple bathrooms, a two-pack may offer better value.
What you will need
- Replacement toilet fill valve (Fluidmaster 400A, Fluidmaster 400H Performax, or compatible model)
- Adjustable wrench or slip-joint pliers
- Towel or sponge
- Small bucket
- Rubber gloves
Safety note
- Turn off the water supply before beginning.
- The shutoff valve is usually located on the wall behind the toilet near the floor. Turn it clockwise until it stops.
- Flush the toilet once to empty the tank. Remove any remaining water using a sponge or towel.
Step 1: Disconnect the supply line
Locate the braided metal or plastic hose connected to the bottom of the tank.
Unscrew the connection by hand, turning counterclockwise. If it’s tight, use an adjustable wrench carefully.
A small amount of water will spill out, so keep a towel or small bucket nearby.
Step 2: Remove the old fill valve
Hold the base of the fill valve inside the tank with one hand.
From underneath the tank, loosen the plastic locknut. Remove it by hand if possible. If it is stuck, use pliers carefully.
Once loose, lift the old valve straight out of the tank.
Step 3: Set the height on the new valve
The new fill valve needs to be adjusted to the correct height before you install it.
Check the manufacturer’s instructions and the marked critical-level line on the valve. On many universal valves, this mark needs to sit at least 1 inch above the top of the overflow tube.
Twist or slide the valve shaft to adjust its height before installing it.
Step 4: Install the new valve
Insert the new valve into the opening at the bottom of the tank.
Press the rubber washer firmly against the inside of the tank and tighten the locknut underneath.
Hand-tighten the locknut first, then tighten it slightly further if necessary. Avoid overtightening because the plastic components can crack.
Next, attach the refill tube.
Clip it to the top edge of the overflow tube. Do not push the refill tube down inside the overflow tube.
A submerged refill tube can create a siphon and cause the toilet to run continuously.
Step 5: Reconnect and test
Reconnect the water supply line.
Turn the water back on slowly and allow the tank to refill.
The water level should remain below the top of the overflow tube. Follow the fill-valve manufacturer’s recommended water-level setting rather than relying on a single measurement for every toilet.
If the water level is too high, adjust the float according to the valve manufacturer’s instructions.
On the Fluidmaster 400A, for example, you can squeeze the adjustment clip and slide the float downward.
Flush the toilet several times. The valve should shut off once the tank reaches the correct water level.
Common Mistakes
| Mistake | Result | Fix |
|---|---|---|
| Refill tube pushed into overflow tube | Toilet keeps running | Clip tube above opening |
| Water level set too high | Water continuously drains | Lower the float |
| Locknut overtightened | Tank or valve damage | Tighten gently |
| Wrong valve purchased | Installation or compatibility problems | Check toilet model and valve compatibility first |
Cost
| Repair | DIY Cost | Typical Plumber Cost |
|---|---|---|
| Fill valve replacement | $10 to $15 | $100 to $150 |
| Fill valve and flapper together | $15 to $25 | $120 to $180 |
Actual plumbing costs vary depending on location, toilet model, and the complexity of the repair.
If your toilet is more than 15 years old and several internal components have already failed, replacing the entire toilet may make more financial sense.
When should you call a plumber?
Call a professional if:
- The shutoff valve leaks or will not close fully
- The tank has visible cracks
- Corrosion has damaged the mounting hardware
- The fill valve cannot be removed without damaging the tank
- The toilet is very old, and replacement may be a better option
Frequently Asked Questions
1. How long does a fill valve last?
Most fill valves last between 7 and 15 years. Hard water can shorten that lifespan because mineral deposits accumulate inside the valve. If your toilet is older and both the flapper and fill valve are showing signs of wear, replacing both at the same time may make sense
2. Will any fill valve fit my toilet?
No. Many standard toilets accept universal valves such as the Fluidmaster 400A, but toilets require specific replacement parts. Check the model number inside the tank lid before buying.
3. Why is my new fill valve still making noise?
A humming or vibrating sound can be caused by the fill valve itself, incorrect adjustment, or high household water pressure.
Normal residential water pressure is generally around 40 to 60 PSI. Pressure above 80 PSI can damage plumbing fixtures and may require a pressure-reducing valve.
4. Can a bad fill valve cause weak flushing?
It can. If the valve shuts off before the tank has refilled properly, there may not be enough water for a full flush.
5. Should I replace the flapper at the same time?
If the flapper is several years old and already showing signs of wear, replacing it at the same time can make sense. Both parts are inexpensive compared with the cost of troubleshooting another running toilet later.
Related Articles
- How to fix a running toilet
- How to stop a toilet from overflowing
- Why is my water pressure low?
- The complete guide to home plumbing
Sources
- Fluidmaster: 400A universal fill valve installation guide – installation steps and float adjustment
- EPA WaterSense: Fix a leak week – toilet water waste statistics
- Plumbing-Heating-Cooling Contractors Association (PHCC) – residential plumbing repair standards